Wednesday, February 3, 2016

The world, in English

No matter if English is our only language, we are able to know what the French Emma Bovary and the Russian Anna Karenina thought and said thanks to translators. And although we can easily name the authors who brought those two famous characters to literary life, most of us would be hard-pressed to identify any translators. After all, aren't they mere conduits, turning the authors' foreign words into English ones?

Read David Bellos' fascinating book, Is That a Fish in Your Ear? and you will have a new appreciation for translators and their craft. Subtitled Translation and the Meaning of Everything, it covers an incredible range of topics, from the development of dictionaries to the dragomen interpreters of the Ottoman empire through to the demands of movie subtitling and the intricacies of simultaneous translating. While it's full to the brim with interesting information, it's not at all academic or tedious to read. (The biggest problem is that you will probably be bombarding your nearest and dearest with surprising tidbits you've just read.)

I've lauded it to my fellow book group readers because, obviously, a Foreign Authors Bookgroup has a special interest in translation. Although, as I have mentioned in previous posts, we do not read foreign authors exclusively, but rather, fiction and non-fiction about foreign lands and cultures. This year, three of our selections are translated from another language, which is actually very substantial percentage-wise. A blog on international literature is named Three Percent because, as is stated in the About section “only about 3% of all books published in the United States are works in translation.” Check out all the great resources they offer to acquaint you with those works.

Here's our literary travel itinerary for the year. Come join us, online or in person if you happen to live in the Dallas area. 


Wednesday, January 13, 2016

The magical hand-rolled hem


Someone somewhere far back in the mists of time figured this out. I never would have. But fortunately there's YouTube and this excellent video. You simply loosely sew a few inches as shown in the first photo, then draw the thread fairly taut and voilà! the fabric rolls inward forming a neat tiny hem. The only thing I would add is that I found it really helpful to accurately find the straight of grain by pulling out a couple of threads down the entire length of the fabric, and then to cut along this line as you go along, just a few inches ahead of where you're sewing, to minimize raveling.

I had enough fabric to cut three scarves. This is my second one. I should be an old hand (bad pun in more ways than one) at it by the time I finish the third one. I'll probably try to sell the extras in my Etsy shop. It's quite enjoyable to sit and stitch away while listening to a good audio book.

Incredibly, Mr. C, who is not at all observant of my wardrobe, found this fabric for me while patiently waiting for me to do some shopping. After all these years he has taken note of my color preferences, and this paisley with its olive green and lavender on a dusty pink ground perfectly complements several of my tops.

Thursday, September 3, 2015

Sewers, ahoy!

Okay, mere stripes do not a marinière make, but Mr. C immediately made the French sailor connection when I first wore this top. It's probably the only striped garment I own. And it's not navy blue but a very deep purple, as are the cropped linen pants, the very last bit on the bolt in this dye lot, because another bolt that was supposed to be the same color was navy blue. I envisioned this very drape-y rayon/spandex knit with a cowl neckline, and I used an old OOP Vogue pattern 9771 to achieve it. The pattern is designed for wovens cut on the bias; I simply used the neckline with my T&T knit top body and it turned out well. I first tried it out with a piece of ancient cotton knit which was not drape-y enough for the cowl neck, but at least I knew that it would work for the striped fabric.   


The linen pants are an L-pocket Frankenpattern that I've been refining for years. Everything is almost perfect, but this time I thought I needed to make the waist a bit looser and overdid it. You can see the waistband protruding under the top because it's not fitting close enough to my body. So, I'm going to have to do a bit of alteration, which I absolutely hate, all that careful removing of thread and working with tiny trimmed seams. But it must be done. 

It's already September and it seems as if I've barely sewn anything this year. In January I made a basic knit top that really wasn't special enough to blog about. Next was a knit cardigan that I was still working on when it became too warm to wear it, and it's waiting for some finishing touches. In May I botched a linen dress, sad story, wrong usage for a beautiful piece of linen and on top of that, it was too tight, even though I'd made a muslin beforehand. Now finally, sewing success! I'm amazed at all those sewing bloggers out there who turn out piece after beautiful piece in quick succession.

The person who first suggested that I start a blog meant a sewing blog, but I knew that my limited output could never fill it. As it is, I've barely posted about anything this entire year. I've read various statistics about the brief lifespan of many blogs; I've discovered some delightful blogs just as they were coming to an end. But this one isn't at an end yet. I enjoy the opportunity to do a little writing and show off assorted projects, and I plan to continue. So, to everyone who stops by, thank you for the visit and come back soon.


Sunday, July 12, 2015

It's good to be Queen

The queen I got to be was Eleanor of Aquitaine in a scene from The Lion in Winter, part of the latest show put on by The Skillman Players. Due to missing a couple of weeks of the acting workshop in the spring while on vacation, I had decided not participate this time. But when another member of our senior acting troupe unfortunately had to drop out, I couldn't resist dropping in for this choice role.

And then it turned out the King was ill. But there are always contenders for the crown, in this case my co-star from our last production, Gilbert Rodriguez, who gallantly stepped in for the first two performances. He even cleverly crafted the crown, so if anyone is in need of a royal stage prop, check out his video here for how to make one. 

I, of course, made my cape, which was simply a yard of fabric from JoAnn's. In the middle of one end of the yard, I sewed some very stiff interfacing, covering the end with gold cord. My original idea had been to make a headdress but the sequined and embroidered fabric was too heavy for that, so it became a cape. The cord goes under my arms and is pinned behind my back, hardly any sewing involved. I'm sure my performance wouldn't have been nearly as queenly without it.


Jerry Weiss, a new member of the Skillman Players, returned to take on the role of King Henry for our final performances at three senior living centers. (Fortunately, Gilbert made the crown adjustable.) Memorization being fairly easy for me, at the point I knew my lines too well, but with Jerry's help, I think I slowed down and managed to be a fairly convincing Queen Eleanor in our final performance last Wednesday. We hope we entertained our audiences; we all certainly enjoyed ourselves as always.

Tuesday, June 30, 2015

A perfect pairing


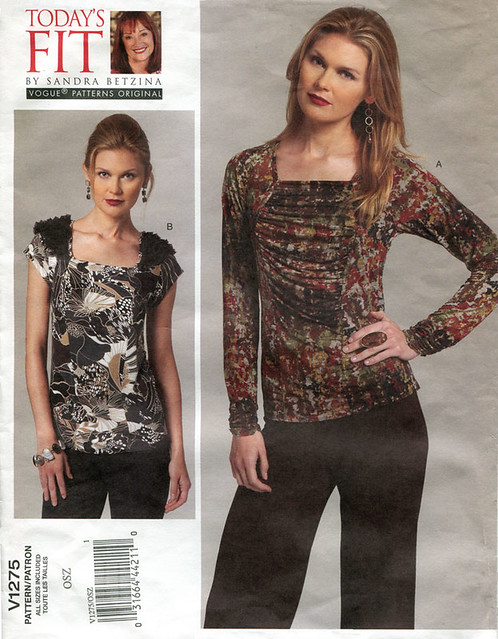
Vogue-1275The lacy purple knit which waited patiently in my fabric stash for close to three years has always been destined for this Sandra Betzina pattern (now out-of-print). It's not actually a knit lace, more like a burn-out; there's probably a precise technical term which I don't know.  Being so lightweight and sheer, it behaved beautifully in the top's gathered inset.  I lined everything but the sleeves with a flesh-colored tricot, truly my flesh color because the unlined sleeves look exactly the same as the rest of the top when I'm wearing it. One very good thing came of waiting so long to make it; I could use my new serger on it.  I still haven't had occasion to wear it, and I'm thinking it needs an amethyst necklace when I finally do.

More info on making this top on Pattern Review.

Tuesday, May 26, 2015

Learn how to do upholstery – Check

Being a life-long DIY sort of person, my response to reading a how-to article or book is usually "I can do that!"  Or, when the prospective project is beyond one-person proportions, WE can do that.  Fortunately Mr. C is also a DIY sort of person, and our skill sets are more or less complementary.  Although our working styles are much less so.  "Get it done" is his motto, while mine is "do it carefully."  So I have to admit there are frequently some raised voices, to put it mildly, but we manage to carry on.


I'm almost embarrassed to show these Before photos of the chaise and one of the two matching chairs which we bought at an auction thirty plus years ago. We'd had them reupholstered professionally back then, but when they started wearing out, I simply couldn't find the right fabric for the furniture and for the upstairs sitting room they occupy.  As you can see, the situation was getting dire: the old fabric was disintegrating and the springs were sagging and poking every which way. 

Here in Dallas we're lucky to have a lot of great discount fabric stores, and in my quest for that elusive fabric, I amassed quite a collection of samples.  I bought a yard of a couple of fabrics that seemed promising only to reject them when I tried them out at home.  And then I not only found a fabric both Mr. C and I liked, it only cost $70!  Yes, for all of it!

To keep it from looking too utilitarian, I made the trim out of the silky fabric; the embroidery just shows as white accents on the cord.

At this point we had decided to tackle the job ourselves. From the pile of books I borrowed from the library, the two we found most helpful were Singer Upholstery Basics Plus by Steve Cone and Spruce: a step-by-step guide to upholstery and design by Amanda Brown.  I especially like the latter book because of a visual chart which shows the pages for specific design features, such as rolled arms or a tight seat.  And after much searching on the Internet, the videos from DIY Upholstery Supply were the ones we repeatedly referenced.  That was also where we ordered our supplies; you can find everything you need there.

We began at the end of December and had it all essentially finished by the end of March.  Here are the After photos, ta-dah!


Yes, there are some flaws which I know about, but you mostly can't see.  And I found it extremely stressful.  Unlike sewing, where you can usually take apart and re-do if something goes amiss, a lot of the steps here were final.  Plus, there was no practicing, just doing. We had to do it right, or as right as possible, the first time.  But it was also interesting, and it's always empowering to satisfactorily complete a challenging project, especially one that involves learning new skills. If you would like to see some of the specific steps in the transformation of these pieces, read on. 

Wednesday, February 25, 2015

Les Trois Mousequetaires


Indeed, these little leather mice are rugged and intrepid, boldly facing our ferocious felines.  I made them using an old Martha Stewart template. The original directions called for them to be made out of Ultrasuede and filled with catnip, but I took inspiration from an old leather mouse bought years ago and mauled by a succession of cats to the point where it's now merely a scrap.  So I wanted these to be able to stand up to  lots of claws and teeth. It looks like the template is not available on Martha Stewart.com, although I did find a couple of other cute rodent toy patterns.  Catnip Rat Toy and Menswear Mouse Toy.  However, if you'd like the template and directions for this particular mouse, just email me and I'll be glad to send it to you. 

Here are a few tips on making it out of leather; by the time I finished the final mouse (the one on the left), I was getting good at turning them out. The first thing I discovered was that sewing them by machine just didn't work:  too difficult to stitch evenly through the thick leather so close to the edge.  However, after cutting the mouse out, I simply stitched around the edge of the entire piece with a leather needle in my machine, but no thread, just punching holes that I could use in stitching it up by hand. Also, using a pair of jewelry pliers to pull the needle through when hand sewing was helpful.  Next, I "embroidered" the eyes (but no nose) and made whiskers out of some upholstery thread/string.  On the third mouse, I also discovered that attaching the ears before I sewed up the body was much easier, as I could match up the needle-punched holes visually.  Then I sewed up the the top seam and finally the bottom seam, inserting the tail and stuffing firmly with polyester fiberfill.  I figure the ears and the tails are the most vulnerable parts so I took extra care in stitching them on securely.  The cats do seem to love picking them up and slinging them around by the tail.  Here, a couple of our porch kitties who are morphing into house kitties are giving them a try-out.