Tuesday, February 21, 2017

And so to bed...

One reason to  keep a pattern that didn't prove completely satisfactory is that it may have design details that will work on an altered version. So when I wanted a loose-fitting pajama top with raglan sleeves and tucks or pleats on the bodice front, this Vogue pattern came to mind.  

The problem with the top I had made from it in a fine jersey knit was that that lovely pleated neckline would never stay straight across like the illustration; the weight and drape of the jersey made it droop quite a bit, regardless of what I did to try to fix it.

 On my pajama top, I actually wanted a rounded neckline, and also a higher one for warmth. I raised the neckline by 1½ inches at the center back, seguing to 1 inch at the shoulder, and raised the top of the sleeves by 1 inch. On the front, while also raising the neckline by 1 inch, I narrowed it 1½ inches at the beginning at the side top, gently seguing back to the original seamline, I kept the same number of pleats, now spaced closer together. I also stitched the pleats down and bound the entire neckline.


I first made a muslin in some old interlock which turned out well, but still drooped slightly in the front, so on my final version, I made the pleats slightly wider, so that each fold abuts the next pleat on the inside. 


I tried double-needle tucks on the sleeve bottom on this version also. It's a nice little detail but if I were to do it again, I would make the tucks longer and closer together to snug the sleeve more to the wrist. I bound the bottom just like the neckline, except with a narrower binding. 

I'm very pleased with how this top turned out. It's very soft and warm since the inside of the knit is brushed like a sweatshirt knit.


The pattern for the pajama pants was traced from some Eddie Bauer pjs that I wore until threadbare. I didn't buy quite enough of the cotton flannel to allow for complete placement on the directional print, so by cutting apart the pattern back about 8 inches below the waist, I was able to make a perfect match with this separated piece.


Well, I'm tired after so much work, time to test out my new jammies. Nighty-night.


Tuesday, January 31, 2017

Reading assignments

So many books out there to read! I used to keep my to-read list on index cards, a fat little stack which I still have. Now I can keep lists right on the Dallas Public Library site as well as on Goodreads, where it's so satisfying to be able to transfer a book over to the “Read Shelf.” But, to face facts, I will never get all those books on my various lists read, however great my longevity. However, bookgroup selections generally make it promptly to that Read Shelf each month because I don't want to miss out on participating fully in our lively discussions. The first of our 2017 selections was delightful and the second a page-turner for me.  I look forward to reading the rest. As always, you are welcome to join us, virtually online, or here in Dallas; just email for location.


Thursday, January 26, 2017

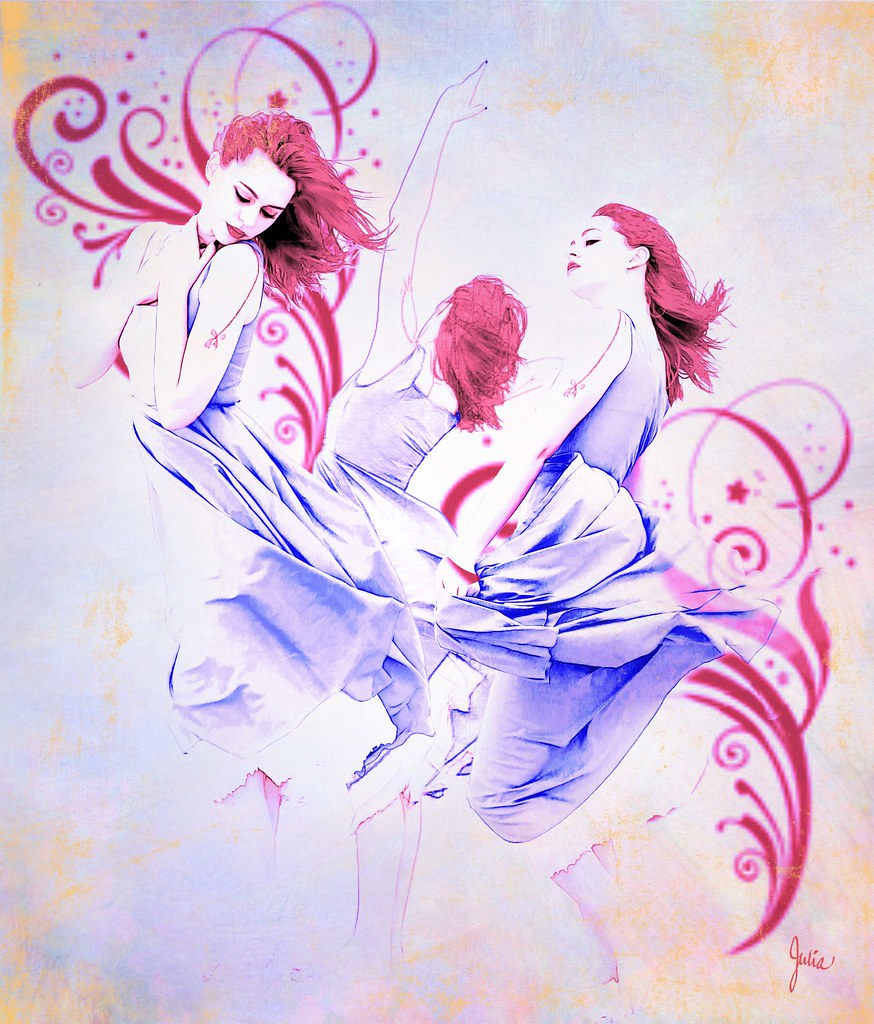
Illustration Friday - Swirl

 
Doing something is certainly more satisfying that merely thinking about doing it. And I have to say I got a lot of satisfaction and pleasure out of composing this piece for this week's Illustration Friday topic – Swirl. I have enjoyed the creative stimulation that Illustration Friday prompts on and off for several years, but there's been too long a hiatus between my last submission and now. So one of my goals for this year is to participate in IF each month.

I never know what I'm going to come up with, or what I'm going to end up with. Because this is nothing like I originally had in mind (which involved swirling smoke). While looking for Photoshop smoke brushes in deviant art, I got sidetracked and came across faestock's series of stock model shots with swirling skirts, and I thought I would just see what I might do with one or several of them.

The technical part for anyone who is interested: I chose three poses and removed the figures from the background. Each figure was duplicated twice. On the bottom copy I used Topaz Labs Simplify with the Pastel II filter (under Sketch), with that layer set to Normal, 100% opacity. On the next copy, I used Akvis Sketch with a Classic Fine Lines filter, with that layer set to Luminosity, 40% opacity. The top layer is the original set to Vivid Light and 100% opacity. I exaggerated the colors and saturation with a Hue/Saturation adjustment layer and also a violet Photo Filter Adjustment layer.

The red swirls are from Photoshop brushes which I've had for some time and may have also been downloaded from deviant art. The gold corners were done with some old Photoshop brushes called Paper Damage that I have found very useful, source unknown..The background is a Flypaper texture with the layer set to Multiply with a Hue/Saturation adjustment layer to change the colors and a circular gradient mask to lighten the center where the figures are.  

As always, I learn something or brush up on something (using channels to make a mask for selecting hair from the background) in Photoshop . Obviously, I could choose a topic or word at random and do this without the Illustration Friday interface. But, as I have said before, I find the deadline that must be met to post in that week's IF an effective spur to finish what I've begun.
 

Saturday, December 31, 2016

Sewing and going

Yes, I'm still here. I was aiming for a monthly post this year, but as summer went by, my priority became planning a long-anticipated trip to France. Which, of course, involved sewing something absolute essential for my travel wardrobe. 
 
Here I am sewing away on a skirt before my very first trip to Europe in 1985. And here you would have seen me a few months ago, once again sewing madly away.
  
This time I required a lightweight jacket that could take all the scrunching up that travel often inflicts, and that was roomy enough to go over a warmer fleece jacket if necessary. And, of course, would look chic enough for Paris but not out of place while, say, browsing an outdoor market in Brittany.  

I happened to have this 2009 Sandra Betzina pattern, Vogue 1097, which, made up in a fluid polyester peachskin, satisfied all of my criteria. 


I love the raglan sleeves, the roomy in-seam pockets, the interesting seaming in the body and the placket with the concealed zipper. What I did not love was that particular hood with its gathered edge, nor the excessive fullness of the sleeve at the wrist, so those two features were modified. My jacket has a plain hood which I adapted from an old pattern.  I narrowed the sleeves and replaced the wide sleeve tab with a narrower band, as on a trench coat. You can read all the details here on Pattern Review


It was a terrific traveling companion. Although it looks better belted, I mostly wore it loose with just the button buttoned. It wasn't a difficult pattern to make, and contrary to my usual practice, I didn't even make a muslin. Well, to tell the truth, I didn't have time to make a muslin. But I'd rather be bent over my sewing machine racing the clock than racing through store after store trying to find something among all those anonymous garments. Or more likely, clicking through website after website. Once again I have to say, I am so glad I sew!

Thursday, June 30, 2016

Watercolors in Photoshop

One of my favorite books back when I was young was The Once and Future King by T.H. White. In it, the wizard Merlyn tells the boy who will become King Arthur that “The best thing for being sad is to learn something.” And I have valued that advice all of my life. Set yourself to learning something interesting, and, for a while at least, worries and problems are kept at bay.

I certainly forget myself when I'm delving into magical, marvelous Photoshop. I've been using it since 2001, but there is always something new to learn. Beyond my shelf of Photoshop books, the Web offers what seems like infinite tutorials, videos, online courses. I subscribe to Photoshop Roadmap which compiles tutorials, tips and techniques on all aspects of PS. In the article "5 ways to create Photoshop watercolor effects, explained and compared," I especially liked the technique demonstrated by in this video by Marty Geller from Blue Lightning TV. 

It's uncomplicated, just a few simple steps, but you have final control of the result. I think it worked best on this image.

 
You can compare it with the original photo I took of ferries in Portland, Maine last fall. The plain blue sky became a lot more interesting due to the brushstrokes applied in the main step. I redid that several times until I got an effect that I liked. 


The lilies more closely resemble the original photo; I increased the watercolor paper texture to give it less of a photographic appearance. I also played with the colors, intensifying the orange contrast in the center of the flowers. 


The third photo was taken in Woodstock, Vermont. I like the way the watercolor technique softened the house and put more focus on the gloriously blooming hydrangea. Nothing dramatic, just pretty, but sometimes that's perfectly satisfying. 


Of course, with all the complexity that Photoshop offers, these steps could be just one effect in a more elaborate composition. In fact, sometimes it's difficult to stop piling on the effects because you never know when something wonderful will appear. And while your eyes are glued on the screen and your hand is clutching your mouse or stylus, you forget that it's time to fix dinner or way past time for bed. You keep going because, as Meryln concluded “...what a lot of things there are to learn.” 


Tuesday, May 31, 2016

A very good vintage

I have long had this 1975 McCall's pattern in my mental queue for a new knit-top neckline and when I saw this similar Talbots top while out shopping this spring, I decided the time had come to make it. Talbots calls their style an “envelope shoulder” tee; the McCall's pattern differs from it insofar as the front bodice hits about four inches below the shoulder, but the construction would be the same. As you can see from my pattern pieces, the back shoulder continues to the front and the front bodice is simply stitched across. You could easily create this using your own basic t-shirt pattern and make the front bodice hit higher or lower depending on how much of the front shoulder is incorporated with the back. 


The straight edge of the front bodice could lend itself to a variety of ornamentation. The old McCall's pattern envelope shows a lace band. I top-stitched with embroidery thread and did the same on the sleeve hems and bottom hem. 


I used the neckline and shoulders, plus the sleeve cap of the McCall's pattern with my TNT knit top body. The back neckline stood out a bit from neck, so I've altered the back slightly, which I hope will fix that. Both of these tops are “muslins,” so to speak. I've started using a cache of very old knits which I was intending to take to the thrift store, so I feel liberated when sewing with them. However, these are keepers. The heathery top with the three-quarter sleeves is a fairly heavy, not-too-stretchy cotton knit; I was a little worried that it would be too tight, but I've worn it several times and found it comfortable.


The top with the elbow-length sleeves is a very soft interlock. I should have put some knit interfacing in the hem because it had a tendency to ripple when I top-stitched it. Aside from that little quibble, I'm totally satisfied with both of these and intend to use this vintage pattern again. 

Saturday, April 30, 2016

Idylls of the Spring

Ah, springtime! Gardening, cleaning, repairing, reorganizing...luckily I seem to have inherited my mother's Energizer Bunny gene. Maybe a little too much so. I have to remind myself that it will all be there waiting for me to do another day, and that the only deadlines I have now are the ones I set myself. Let's go! I finally say to Mr. C who is always ready to hop in the car and drive off to see something different. And what a discovery we made a couple of weeks ago after I happened to notice an announcement for an open house at the Cleveland Amory Black Beauty Ranch about 80 some-odd miles southeast of Dallas.


It's been there nearly as long as we've been here, but we had never heard of it. Although I had heard of Cleveland Amory because many years ago my mother had given me a copy of The Cat Who Came for Christmas, a best-seller about his cat Polar Bear. An author, reporter and TV commentator, he also became an animal rights activist, founding the Fund for Animals and establishing the Black Beauty Ranch as a sanctuary for abused animals, now the largest in the nation. You can watch a short video and read all about it here.

  
A few miles from our destination we turned down a narrow country road which is where we came upon a sweep of pastureland populated by an assortment of mules, donkeys and burros. It's been a mild spring with ample rain, so everything was wonderfully lush and green, especially on this overcast day. 


We were thankful for the clouds when we went on the “hay ride,” actually seated on hay bales atop an flat-bed trailer. That's Sean, our driver, who hopped out to commune briefly with the camel.


Of course, we toured only a tiny fraction of the 1,400-plus acres that comprise the ranch, but we had glimpses of a variety of the many species living there, from a trio of tigers to this handsome longhorn steer.


The horses, however, stole the show, coming up to the trailer to have a good look at the latest batch of humans who had come to look at them. 


If they could talk, they would surely echo the concluding sentiments of the original Black Beauty from Anna Sewell's classic children's book from which the ranch takes its name. “I have nothing to fear, and here my story ends. My troubles are all over, and I am at home.” A beautiful East Texas home it is. We were so glad we went.