This time of year I can't resist plucking particularly enticing leaves from the rich panoply of shapes and colors strewn on the sidewalk. Then I tuck them into books where I come across them months later, brown and brittle. I always think that I will do something creative with them, but what?
Here's
one idea that I found on Pinterest, but instead of using paint, I did it the non-messy way: digitally. It's so easy, and here's how to do it. I'm using Photoshop CS3, but I'm sure you can do the same in any similar program. .
First scan in each of your leaves. Next, create a new file whatever size you want for your finished composition. I made mine 8"x10" with a 150 pixels/inch resolution. Now, on each scan, select the leaf; it's easiest to first select the white background and then inverse your selection. You'll probably also have a tiny bit of shadow around parts of your leaf which you'll need to remove from your selection. (I used the lasso tool.) Then just drag your selected leaf over to your newly created file. Each leaf will be on a separate layer. You can then arrange them in any order that you wish by moving the layers above or below each other. And you can rotate the leaves, even resize them.
Once you have the composition that you like, select all the leaves by holding down Shift & Ctrl while you click each layer. Now, go to the Select menu, choose Save selection, name it and click OK. Do all this again, omitting the bottom leaf; save and name that selection. Continue to repeat this procedure, each time omitting the next leaf in your stack. Then select, save and name your top leaf. At this point, you can delete the leaf layers, if you wish, or simply turn them off.
Finally you're ready to start having some fun! First create a new empty layer on top of the white background layer. Next, load the selection that contains all of the leaves and then INVERSE the selection. With your brush tool selected, choose Airbrush soft round from the tool drop-down bar. Set the opacity to around 30% and the flow about the same. Choose a foreground and a background color. I started with a golden yellow and an orange. In the brush palette, you can check Color Dynamics and move your Foreground/Background jitter to around 50%, and the same with your Hue jitter and Saturation jitter. This will just give you more variation in the color you put down. Increase your brush size to 300 pixels or above and sweep around the outline of the leaves. At this point all of the leaves will remain white; you are only painting the background. When you're satisfied with how that looks, deselect your selection.
Load your next selection which does not include the bottom leaf, and remember to INVERSE the selection. You will now be painting OVER the bottom leaf and around the outlines of the other group of leaves. I reduced the opacity of my brush and changed my colors slightly. Remember, if you don't like something you can undo it, or skip several steps back in the History palette. Or in the History palette, you can make a snapshot each time you've finished a step and are happy with the result.
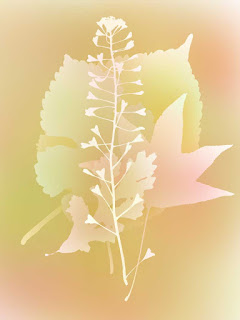
Continue loading and painting around each selection of leaves until you have only the final one on top; just go over that very lightly with your brush. I actually did this four different times on separate layers, changing my colors a bit each time. I played around with various blend modes on those four layers but finally left them all at Normal. Because none of the layers were totally opaque, all together they added richness to the color. And that's the result you see right here. Then on one of the layers, more or less by accident, I added a drop shadow which created the unexpected effect you see above. And I changed the blend mode on the layer beneath it to Dissolve.
Which just goes to show how much variation you can achieve with this basic technique. So collect some leaves, scan them in, and experiment away! (And, in conclusion, may I say that I had no idea how difficult it is to write a simple Photoshop tutorial. I hope I've made it clean enough.)

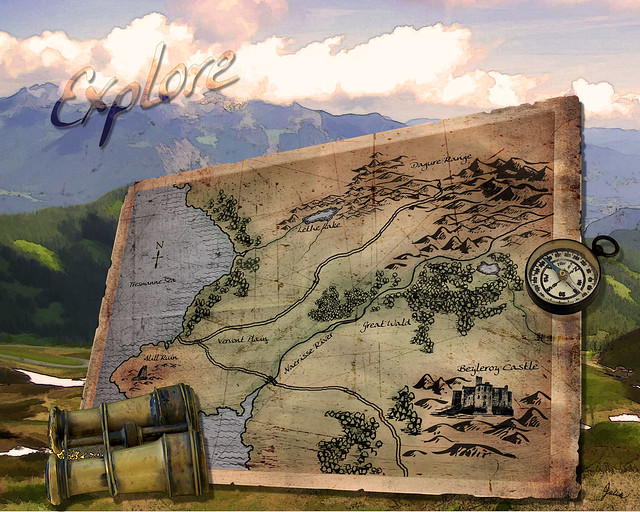 In the course of illustrating this topic, I discovered and explored a whole new world that I had no idea existed: fantasy map making. Just Google "fantasy maps" to see an incredible variety. This simple map took hours to do, several of which were spent perusing the many online resources, such as Cartographer's Guild. That's where I found a link to a tutorial on creating a realistic coastline. And all those hills and mountains, trees and the couple of lakes – made with free Photoshop brushes downloaded from Deviant Art. Now, the castle and the ruin are my own handiwork, created from photos and reduced to icon size. The map "paper" is from Lost and Taken which offers a wonderful selection of textures, also for free. The distressing brushes used on the map were downloaded a few years ago, so I no longer know their origin, but they are so useful.
 The rest of the composition was done a bit hurriedly since time was running out. The mountain scenery as well as the binoculars and the compass were found on stock.xchng, my favorite hunting ground for free photos. I used Topaz Simplify filters on the mountain photo with a warming Photo Filter layer to bring the tone more in line with the map. The compass and binoculars were simply cut out from their background, with a Find Edges filter on a duplicated layer above, set to Multiply.


