 |
| Simplicity 4076 |
Last year I did a short post on knit top necklines, but here I'd like to show you in more detail exactly how I graft other necklines onto an existing pattern. Keep in mind that I've taken no pattern drafting classes or the like, so this is a somewhat trial-and-error method. But, with a little (or to be honest, a lot) of patience and some experimentation, you should be able to achieve satisfactory results.
To begin, as I said in my earlier post, I always use full pattern pieces: bodice front and back plus a left and a right sleeve, because it's so much easier to align your pattern correctly on a single layer of knit. With that single layer you can usually visually align your pieces with crosswise rows as well as with the selvedge, and the more accurately you have it aligned, the better it will fit. Then, simply place the bodice front with the neckline you want on top of your TNT knit bodice, aligning the center fronts.
In the case of this black top, the shoulder of the old pattern piece met the shoulder of of my TNT bodice, but if you wanted the neckline higher or lower, you would, of course, not alter the shoulder height of your TNT bodice, only the neckline. This was a relatively simple neckline to adapt; it was, however necessary to make a slight adjustment to the back neckline, so that it would meet the front neckline correctly. Always overlap your front and back bodice pieces at the shoulder seams to make sure they will sew together correctly. And because of the way this neckline was shaped, I made a mini-facing about 1" wide, rather than use a continuous binding piece as I would on a round or surplice neckline. This was topstitched down with a double needle exactly as I would do with a binding.
 |
| Vogue 7147 |


The aqua top has a much more complicated neckline, and what was confusing to me as I was adapting it was what happens to the armholes, because, as you can see, they are a different shape from the standard armhole as a result of extra fabric that is necessary to make the neckline pleats which pushes the shoulders of the pattern piece way out to the sides and thus gives an extreme curve to the armholes. I had a hard time visualizing/believing that, once the pleats were sewn, the armholes would magically be right. Well, yes they were, and so I learned that, at least with knits, it's the total length of the armhole that's essential.
 |
| Vogue 8663 |
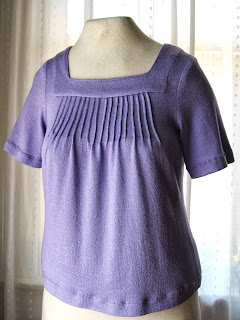
And it was thanks to making that top that I was able to more easily understand what needed to be done to create the pattern for the square neck top where the front armholes are also curved out in a similar manner. I began by overlaying a very old pattern from my collection, Butterick 4774, on my TNT bodice front and traced a new pattern, using only the neckline from the Butterick, lengthning from the bottom of the neckline up to the shoulder to match the length of my TNT bodice. Because I wanted smaller tucks, I then overlaid an old Vogue pattern 8297, which, luckily, matched up nicely. I suppose I could have simply figured out how to divide the tucks on the Butterick pattern to make smaller ones, but as math is not my specialty, this was simpler for me. I also made my bodice front slightly fuller through the waist and hips because I thought it would look better with the fullness from the tucks at the neckline. Then, of, course, I made the square neck back, using the my TNT bodice back and the back neckline from Butterick 4774. Backs are fairly trivial compared to fronts, but you must make sure both shoulder and side seams match up. If your top also has a separate band, as this one does, remember to include it when you are determining how high or low to make your neckline.
 |
| Butterick 4774 |

 |
| Vogue 8297 |


To read my pattern review on making this top, click here.

So start searching in your stash of old patterns for necklines that you might like on a knit top. I also keep pages from catalogs that have knit tops with necklines of interest. Or you could make a Pinterest board. And then try out some pattern "hacking" (new term recently encountered on Pattern Review) of your own.


Thank you so much!! Very clear and very helpful tutorial on changing necklines.
ReplyDeleteI do envy you Julia, your ability to make lovely clothes and to be so versatile as to adapt them too.
ReplyDelete