Showing posts with label sewing. Show all posts

Monday, October 31, 2022

Silk samples top

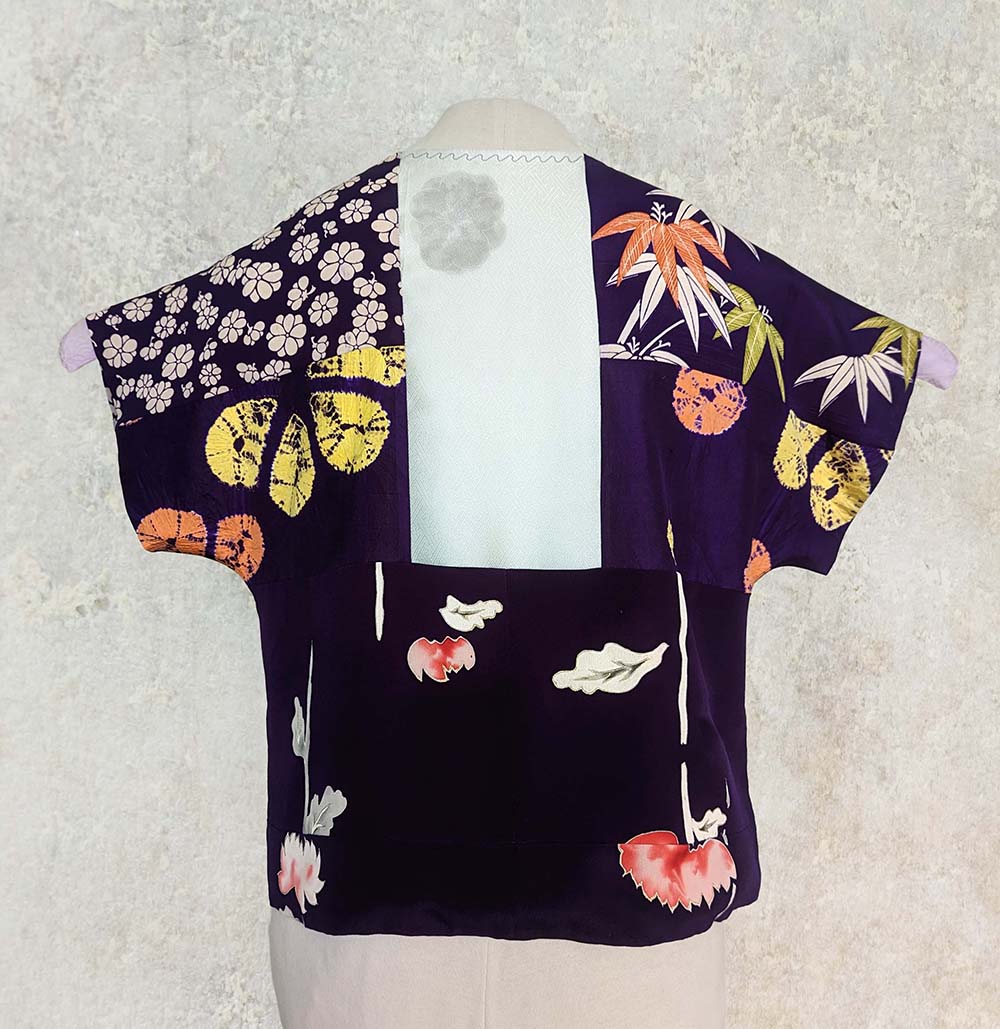
One dollar bought a little hanger with five or six fabric samples. They had come from a seller of Japanese textiles who was retiring and were being offered at a meeting of the Dallas Area Fiber Artists. Most were gorgeous silks, of which I managed to acquire enough in related purples to piece together this top.

The pattern is adapted from Vogue 8497 by Marcy Tilton. And I didn't have a sample to spare! After deciding on the arrangement of the samples, I sewed them together with tiny one-eighth inch seams to create a whole piece of fabric from which I cut out the pattern. Then I lined the top with off-white silk crepe de chine from Dharma Trading Company.

All the different projects which DAFA members had made from the samples were displayed in a contest at the last meeting. Alas, I did not win a prize, but having this top to wear is reward enough. 


Thursday, September 22, 2022

Second time around

Once the fabric for this t-shirt was a totally different color with totally different designs. And it just wasn't right. Eventually I decided the only solution was to start over. Some yellow swirls refused to be removed, but I think they just add another layer of complexity under the new design.

For my new color, I wanted a pinky peach which I mixed using Deep Orange, Bazooka Pink and Dusty Rose. For the two contrasts I add some Pomegranate and some Nightshade. All of these are Fiber Reactive Procion Dyes from Dharma Trading Company (some colors no longer available), made up into dye concentrates which I apply by mixing with print paste. 

I began by stenciling the small swirls with a stencil I purchased from Michael's. Then without letting that dry, I used a natural sponge to dab a slightly lighter color mixed with a thinner print paste over all the pieces.

The second session was simply stenciling the one-half inch and one-fourth inch squares (cut on my Silhouette Cameo) in the two contrast colors. And that was enough, so, all in all, a fairly simple design to achieve. (Although all that stenciling and dabbing took quite a bit of time.)


The pattern I used is a copy I made long ago of L.L. Bean's Saturday T-shirt, which is a loose, boxy tee, super comfortable for summer. The fabric is a non-clingy cotton jersey from Dharma. It's so much easier to print the individual pieces while they're flat on a table and sew it up afterwards.

Tuesday, June 30, 2020

Tunic or not tunic

My dear old Pfaff has been having a bit of a rest for the past few months. I did revise my basic knit top pattern, with both set-in and raglan sleeves, for a somewhat looser fit, and I made prototypes of each. Beyond that all I have sewn is masks...ho-hum. So I thought I would review a couple of garments I made at the end of last year and the beginning of this.

One plus of getting older is, hopefully, knowing yourself. Knowing your strengths and abilities, and your weaknesses as well. Knowing how to make the most of the former and cope with the later. At the same time, it's also important to remain open to possibilities and to change. I don't want to be that frowning old lady pounding my figurative cane and decrying everything about life today.

That's true about fashion, too. I think I know what suits me, what flatters my small but not especially slender frame. I know how I want to look, the kind of styles that make me feel mentally at ease. But, once again, I don't want to get stuck in time, closed off to what's new. So, although I don't feel the need to keep up with trends, I do venture out of my fashion comfort zone from time to time. 

Now, tunics are not exactly cutting edge, I know. Young and old, everyone is wearing tunics. Not only are they comfortable, they also glide forgivingly over buldges. My main problem is with proportion. Since a tunic falls below the hips, it visually shortens the legs, an oh-oh for already short-limbed me. Still, I was taken with the creative tunic designs from Marcy and Katherine Tilton in Vogue and Butterick patterns.

Then I fell in love with a digital print knit from Mood Fabrics. It has the deep reds and purples that go with so much in my wardrobe. But it's also a very busy print, so I knew I needed to make it into a simple garment, something flowing that would show it off. Butterick 6136, a tunic by Katherine Tilton seemed to be the answer. The photo of View C on the pattern envelope even showed it made up in an equally busy print.

First, of course, I made a trial version in some of my seemingly inexhaustible stash of old cotton interlock which I over-dyed (from a tint that looked liked the old Flesh crayon) in a rich Procion color called Pomegranate. I used the size M cutting lines, but I think it would have fit better had I used S, because it is generously sized. The pattern description says it is fitted through the bust, which I take to mean more close-fitting than my tunics turned out. I think I would have been happier with them if I had simply made them less roomy.

I adjusted for proportion by shortening it about 2 inches on the “skirt” section. I shortened the sleeves considerably which I have to do on every pattern and narrowed by shoulders by 3/4”. I also narrowed the upper back by about 1/2”.

It's a very easy garment to sew, nothing whatsoever complicated about it. For the solid color tunic, I made View B with the stand-up collar and decorative top-stitching which I did with a small machine embroidery stitch and regular thread. Then I added beads along the stitching to give it a bit more emphasis. I also added a line of decorative stitching with beads down the back.

So I wore it and liked it well enough that I thought the pattern would indeed be just right for the Mood print. Even better, in fact, because the print fabric was softer and drapier than the cotton interlock and would look a bit sleeker. Or so I thought.

This time I used View C which is exactly the same except for the twist collar and no decorative stitching. Even easier to make the second time, of course. But when I tried it on, I felt overwhelmed by the print, by such a large expanse of print. Mr. C convinced me to wear it once, and it looks better in the photos he took of me than I thought it looked when assessing it in the mirror. But I don't see it turning into a go-to garment as I had expected all the times I had looked at the beautiful fabric before sewing it up.

So, is there a moral to this sewing story? Hmmm.... Maybe learn from your mistakes. Well, not really mistakes, but not stellar successes. Unlike trying on a garment in a store, you can never be totally certain of the sewing outcome, no matter how long you have been sewing, no matter what prep you do to make the garment as perfect for you as possible. I tried something a bit different for me, and maybe I'll come to like them more with time.


Thursday, April 30, 2020

More Marcy Tilton

All dressed up and no place to go, like everyone else during this extraordinary time. But even in normal circumstances, I have more outfits than occasions to wear them. That is due both to the fact that I am not very social, hence the lack of occasions, and to my love of sewing, resulting in the outfit surplus.

Yes, I do love to sew. I love fabric, the luscious colors and tactile textures, the eye-catching patterns and prints. I love spreading my stash out, pairing various pieces, imaging what they might become. Versatile jackets, tops that would go with pants, even dresses which I hardly wear anymore. It's a gorgeously attired fantasy life that I'm envisioning, just waiting for me to sew it into reality. 

And sew it I do. But slowly, and carefully. Which is why my closet can still contain my clothes and why my stash barely seems to diminish. First there's the pairing of pattern and fabric, then refining fit and finessing details. I want to make each and every garment the best I can. I want it to fit and feel and look exactly right, so I'll be happy wearing it.

So even a “wearable muslin” gets meticulous treatment. Which is what this Marcy Tilton top was intended to be: a trial for a rather bold printed knit that had been maturing in my stash for some time. I went to my well of old cotton interlock which has still not run out, and found this not-quite-navy dark blue which I paired with some scraps of a bright leaf green knit for contrast.

I made several changes which you can read about on my review on Pattern Review. It's categorized as Average or, in French, Less Easy, to sew, which rating it earns, in my opinion, due to the squared-off cut of the sleeves where they attach to the body. But I really like the unique look it gives to this top. The other out-of-the-ordinary styling detail is pockets created by a separate lower front piece. I added the buttons and tabs both to keep the pockets from being so floppy and to repeat a touch of the green of the neck band. 

The back is slightly shaped with a casing which I also handled differently than the pattern instructions, inserting a stitched-down band rather than a knotted tie. I think these interesting details show much better in a solid color fabric than in the prints shown on the pattern envelope. So I nixed using my printed knit for it.

Since blue is a color I rarely wear, it turned out that I had no bottoms to pair it with. Even my jeans were the wrong color of blue. So I ended up making a pair of ponte pants using a simple faced-waist pattern (OOP McCall's 5672) that was designed for wovens and omitting the zipper. The ponte is stretchy enough to allow them to be pulled on. And to make sure the waist stayed snug while wearing them, I stitched 3/8-inch clear elastic to the inside of the facing after stitching it to the pants. I copied the pocket from a pair of bought pants.

Now all I have to do is wait for an opportunity to actually wear my new outfit. Sometime when we can all get together in person again. Until then, stay safe, stay home and keep sewing.

Saturday, February 29, 2020

Little red riding hood

Or so Mr. C immediately dubbed it. As far as I'm concerned the hood is merely an elaborate collar since I can't imagine that I would ever want to wear it up. But other than that, Marcy Tilton's modern hoodie has my heart. So flattering, shaped in front with princess seams while the two-piece back has a sort of peplum that flows forgivingly over the posterior. So easy to put together as well, although some precision top-stitching is required, especially on a solid color fabric, to make it look its best. And isn't this rose red color lovely...yet more of my ancient stock of cotton interlock. All these many years after I bought it, I'm certainly getting my money's worth out of it. 


On Pattern Review I detailed the specific construction changes I made, which mostly concerned how I finished the various seams, but couldn't post all the relevant photos there. So here they are.

Friday, November 22, 2019

Buttoned up

Sometimes you can't resist the temptation of new fabric, even with a sizeable stash waiting to be sewn. And the minute I opened the package from Marcy Tilton to see the heathered violet linen I had ordered, I was glad I didn't. Luscious color, excellent quality, summer-perfect weight for a top. So how was I going to make it up?   

I wanted something simple, easy-to-wear, loose but not oversized. So I turned to Pinterest and searched for linen tops. Well, you know how it is, diving into Pinterest searches. Soon I had a board of tops with interesting detailing: pleats, tucks, creative necklines. My eye kept returning to one with a neckline placket 
 closed by two Chinese knotted ball buttons.

 The neckline and the general look of the top were the only things I copied, preferring to have a set-in rather than cut-on sleeve and a slightly more shaped body with bust darts. I used Butterick 5390, version C, shortening it to hip-length, with the back slightly longer than the front, and making the sleeve just above the elbow. And, of course, re-doing the neckline.
  
But, oh, those buttons! I got out string and tried following along on YouTube videos...without success. It looked so simple but I could never seem to get anything reasonably resembling those ball buttons. Finally I remembered that I actually had a book on Chinese Knotting (by Lydia Chen ISBN 0-8048-3999-0), with the steps clearly showing the process for tying the button. Still, it took me a very frustrating morning until I achieved the elusive knot. (For anyone trying this, the secret is in the careful pulling and tightening of the cord.) 
  
The next step was covering the string with the linen. I stitched a very narrow bias tube and turned it right side out, pulling it over the string as I did so. Because It was bias, I could stretch the fabric to be narrower that the tube I had stitched, making it fit snugly over the string. In retrospect, I wish I had used a smaller cord to make slightly smaller buttons, as I was worried that the weight of the buttons on the lightweight top might make them droop. I really haven't had a chance to wear the top, since I completed it just after our late warm weather ended, but it seemed okay even with the larger buttons when I had it on for Mr. C to snap some pics. 


The placket was stitched to the inside, turned to the outside and top-stitched. The string inside the bias tube of the buttons was cut off close to the knot and the remainder of the tube inserted under the little crosswise pieces and top-stitched down. The same tiny bias tube minus the string was inserted in the other side of the crosswise pieces for the loop to close the buttons. The neckline is finished with bias. I serged the side, shoulder and sleeve seam allowances before stitching the seams. 

Altogether I'm totally pleased with how it turned out, and I can't wait for next summer to have a chance to wear it.

The cropped pants I'm wearing are also linen from Marcy Tilton.


Monday, October 7, 2019

AtTIEre

Somewhere in this city lives a man who once possessed hundreds of fine silk ties. Why he had so many, I don't really know. Nor do I know why he donated all those beautiful ties to the Dallas Area Fiber Artists. When I joined the organization last October, the ties were being sold in color-coordinated packages of nine for $5. Their purpose was to be used in the 2019 Tie One On members' challenge. The main requirement was that the ties compose 80% of the objet created using them.

For only $5 I couldn't pass up a pack of ties even though I didn't think I would be entering the challenge, having a line-up of other projects that claimed priority. And, indeed, it wasn't until July, the very month that the entries had to be turned in, that I decided to participate. A search of Pinterest will show you a mind-boggling array of creations using men's ties, but in the end I decided to do what I know best: make a garment. Specifically, a vest, since that uses a minimal amount of fabric. 

For my pattern I simply changed the neckline on Vogue 9478 (from the 1990s) which has side panels joining the fronts and back. Beginning with the fronts, I moved my selected ties around on each pattern piece until I felt that the fabric from each tie was being used optimally, then cut the tie fabric apart. Originally I had intended to piece and sew them onto some very lightweight non-woven interfacing, but after having pieced the entire vest, it seemed to need more structure, so I removed and pieced them onto iron-on interfacing. Exposed edges on each piece were turned under and stitched with metallic thread. A button was found in my button box, with three little blue glass beans added to pick up the pattern in the foulard of the neckband. The biggest expense was gray silk lining from Dharma, which I felt the lovely silk of the ties themselves deserved. 


While I didn't win any of the challenge prizes, I did enjoy the project, although I'm not sure I can envision actually wearing the vest. It has joined the Texas road map vest which I made also as a DAFA project. Now there's a recycled fashion show coming up for October; wonder what I could make for that...


Sunday, December 16, 2018

The Texas road map vest

I should really call this post The obsessional saga of the Texas road map vest. First, here is the result. 


And now I'm sure you're dying to know how and why it I made it.

To begin at the beginning (but skip on down if you'd simply like to know more of the how and not the why)...  Anyway, the beginning was my discovery via Meetup of The Dallas Area Fiber Artists.  I went to the October meeting which was attended by a large and diverse group of women (and a couple of men).  Liza Mackinnon gave a terrific presentation on her intricate paper clothing sculptures, several of which she brought to show. And they were what I had in mind when I started thinking about creating something Texas-themed for the November meeting and holiday party. 

Those free road maps you get at the welcome station to each state – how can you just throw them away? Pinterest has boards full of clever ideas on how to use maps. And I thought it was entirely possible that I could assemble a simple vest, wearable on one occasion, out of my Texas road maps. But as the idea evolved, it turned toward printing the map on fabric, and I was even able to find a pdf of the current Texas road map online, eliminating the need for scanning. 

Friday, August 31, 2018

New fabric, old pattern


The last thing I need is more fabric, which, of course, doesn't keep me from buying more. Anyone who sews understands the difficulty, the near impossibility, of passing up something that is just perfect for a certain pattern, that will “go” with something else, or, in this particular case for me, has colors I like to wear. As you can see, it's sort of a stripe on a very fluid rayon. I was determined not to let it languish in my stash, so began the hunt for the perfect pattern.
  
One thing I have more of than fabric is patterns. Several years ago I organized them and, using a page layout program, made a pattern catalog. So now when I want to look through my own patterns, I don't have to actually go through my pattern boxes. Instead I simply scroll through the files on my computer. And, as I'm sure I've said before, I keep old, even old old patterns because of certain design elements that I can see looking completely contemporary on a new garment.

I remember making this 1970s Butterick pattern in a plaid gauze, much like the illustration on the envelope. I could see my new fabric made up in this because it's a simple silhouette, so undemanding on stripe matching. And I could cut the yoke with the stripes running horizontally and the body with the stripes vertical. Plus I liked its looseness for the fluid fabric.

Alas, I am no longer a size 8, but this was a very easy pattern to enlarge. On the yokes I added 5/8-inch to both top and bottom seams. I also scooped out the front neckline a bit more. Both these changes required drafting new facings which is basically just tracing the new neckline. On the body, I increased the side seams by 5/8” at the top, widening to 1¼ inches at the hem, keeping the same curve as the original pattern pieces. They were also intended to be cut on the bias but worked just as well with the lengthwise grain running up and down.


I wish I could say that thanks to promptly sewing this, I did not add more fabric to my stash, but unfortunately, thinking I would have to do some stripe matching/maneuvering, I bought too much fabric for this simple top. Too much to relegate to the scrap box. So I give myself -1 for buying more fabric, +1 for promptly sewing it, +1 for reusing an old pattern, and -1 for having too much fabric left over. It's a draw. But I did get this very nice top out of it.  

Saturday, June 30, 2018

Almost Very Easy Vogue

Okay, I admit that easy-breezy sewing is not my thing. If I'm going to spend my time making something, I want it to be in my wardrobe for more than one season. That doesn't mean I turn up my nose at Very Easy; I just want it to also be Very Well Made. I want it to keep looking good (especially if it turns out to be a fave that I reach for over and over).

So, on Very Easy Vogue 8534, I was not satisfied with the raw edge neckline that's only finished with top stitching. I know raw edges and the deconstructed look are trendy, but I also know that a neckline needs stabilization or it will stretch out of shape. No problem, I'd just give the neck edge a different, better finish, like a self-binding. But no...that wouldn't really work on the front because the neckline drapes and then goes on to become the two bow ends that need to be fluid. I tried a rolled edge on the serger which I liked for the front but not for the back which should lay smoothly against the neck.
After too much trial and error, I ended up binding the back neck edge while turning under about a 1/8 inch on the front neck edge and bow ends and zig-zagging over them. In retrospect, I see that what I should have done was finish the front and back neck edges separately before sewing the garment together. Which I'll do when I make it again, because I like it well enough to want an autumnal version with the longer sleeves. The bow neckline is flattering and the front darts and center back seam give it some subtle shaping. I also appreciate the cut-on sleeves, which, like raglan sleeves, are a blessing for those of us who normally have to narrow the shoulders for set-in sleeves. 

This is an OOP pattern from 2008, but you can still find it on Etsy or eBay. It's for moderate stretch knits; mine is made from my seemingly endless stash of old cotton interlock. You can read a bit more detail about it on Pattern Review.


Friday, December 8, 2017

Embroidered and beaded version B

Although it took me a while to blog about it, I did get right on to stitching up version B of Marcy Tilton's Vogue 8497.  The shady chartreuse cotton interlock that I picked out of my stash almost matches the garment on the pattern photo.  I hope I'm going to like it as well as I do version A.  There's not too much to add to the info in my last post on that short sleeve top with its zig-zag front and back seams.


Once again, instead of overlapping the curved front and back seams, I turned under the seam allowances on the top pieces and stitched them close to the edge and then again a bit over 3/8 inch away. These seams I embellished with a Double Cretan stitch, using two colors of embroidery floss and accenting that with seed beads in a green-turquoise range. The neckline is also simply bound, as I did on the red version, then embroidered and beaded exactly like the front and back seams.


I hemmed the sleeves and the bottom with a double needle.  On the sleeve hems I worked the straight version of the Zigzag Chain Stitch that I used on the neckline of the red top.  I used two strands of embroidery floss in the two different colors of the other embroidery and put a seed bead in each stitch. 

I used the size 12, but did stitch the side seams with a ½ inch seam allowance, rather than 5/8 inch.  One thing to note in construction is to make sure the front and back seams meet precisely at the shoulders, and that the uneven hems meet at the correct place.  There must have been a small amount of stretching or distortion when I cut out the garment, and if I hadn't been careful about matching these up, they would have been off just enough to cause a problem.  Also I used a narrow fusible bias stay tape on the neckline edge which had stretched while I was doing the embroidery and beading. 


I found that the embroidery and beading went fairly fast, as I sat at my sewing table listening to The Color of Lightning by Paulette Jiles.  (IMO, audio books are one of the best things that ever happened where sewing is concerned.)  Now I've started on something more pedestrian, some olive-y denim pants that I know will be a welcome addition to my wardrobe.  But not as rewarding as making this fun top.